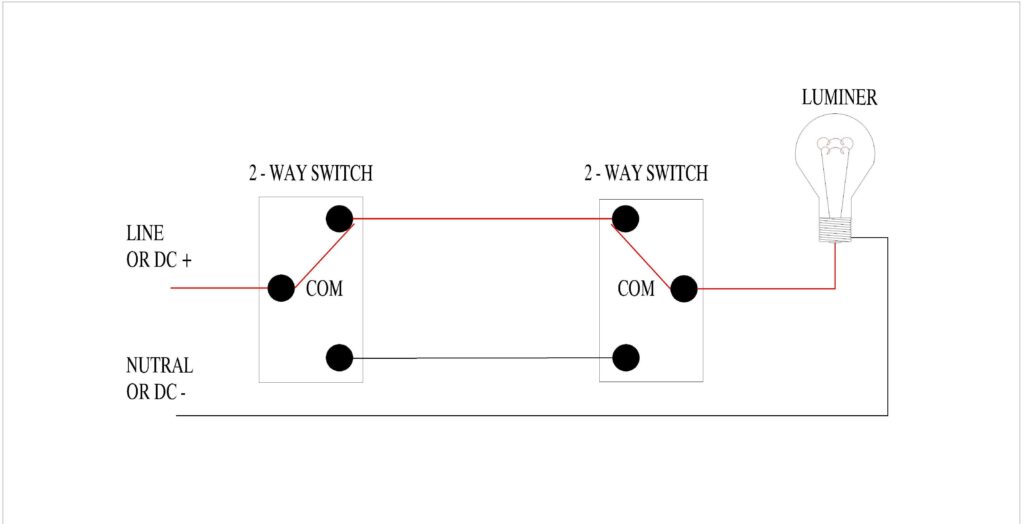
A 2 way switch wiring is a common task for many homeowners and DIY enthusiasts. It’s essential for controlling lights from two different locations, such as at the top and bottom of a staircase. In this comprehensive guide, we’ll walk you through the process step-by-step, ensuring that you can complete this task safely and efficiently.
Table of Contents
What is a 2 Way Switch? 🤔
A 2 way switch is a type of switch that allows you to control a single light from two different locations. This is incredibly useful in areas like hallways, staircases, or large rooms where having multiple control points for the lighting can be very convenient.
Tools and Materials You'll Need for 2 way switch wiring 🛠️
Before you start your 2 way switch wiring, gather the necessary tools and materials. Here’s a handy checklist:
- 2 way switches (2)
- Screwdriver set
- Wire cutters/strippers
- Electrical tape
- Voltage tester
- Electrical box
- Wires (red, black, and ground)
- Wire nuts
Safety First! ⚠️
Working with electricity could be dangerous, so it’s important to follow safety precautions:
- Turn off the Power: Always turn off the power at the circuit breaker before starting any electrical work.
- Use a Voltage Tester: Confirm that the power is off by using a voltage tester on the wires you’ll be working with.
- Wear Safety Gear: Use safety goggles and gloves to protect you from electrical shocks and debris.
Understanding the 2 way switch Wiring Diagram 📜
Before diving into the wiring process, it’s important to understand the 2 way switch wiring diagram. Here’s a simple explanation:
- Common Terminal: This is where the power source or the light fixture connects. It’s usually marked with a different color (often black).
- Traveler Terminals: These are the terminals that connect the two switches. They are usually brass-colored.
- Ground Terminal: This is for the ground wire, which is typically green or bare copper.

Step-by-Step 2 Way Switch Wiring Guide 🪜
Step 1: Prepare the Electrical Boxes 📦
- Install the Boxes: Install electrical boxes at both switch locations.
- Run the Wires: Run a 14/3 or 12/3 cable (depending on your circuit) between the two boxes. This cable should have three wires: black, red, and white, plus a ground wire.
Step 2: Connect the First Switch 🔌
- Strip the Wires: Use wire strippers to strip about 3/4 inch of insulation from the ends of the black, red, and white wires.
- Connect the Common Terminal: Connect the black wire from the power source to the common terminal of the first switch.
- Connect the Traveler Terminals: Connect the red and white wires to the traveler terminals. It doesn’t matter which traveler terminal you connect each wire to, as long as both switches are consistent.
- Connect the Ground Wire: Attach the ground wire to the green ground screw on the switch.
Step 3: Connect the Second Switch 🔌
- Strip the Wires: Strip the ends of the wires as you did with the first switch.
- Connect the Common Terminal: Connect the black wire leading to the light fixture to the common terminal of the second switch.
- Connect the Traveler Terminals: Connect the red and white wires to the traveler terminals, matching the connections on the first switch.
- Connect the Ground Wire: Attach the ground wire to the green ground screw on the switch.
Step 4: Connect the Light Fixture 💡
- Prepare the Fixture: Strip the ends of the wires coming from the second switch and from the light fixture.
- Connect the Wires: Connect the black wire from the second switch to the black wire of the light fixture. Connect the white wire from the light fixture to the neutral wire in the electrical box. Finally, connect the ground wires together.
- Secure Connections: Use wire nuts to secure all connections and wrap them with electrical tape for added safety.
Testing Your Work ✔️
Once all the connections are made, it’s time to test your work:
- Turn on the Power: Go back to the circuit breaker and turn the power back on.
- Test the Switches: Flip each switch to ensure that the light turns on and off from both locations. If everything works correctly, you’ve successfully done your 2 way switch wiring!
Troubleshooting Tips 🛠️
If your switches aren’t working as expected, here are some troubleshooting tips:
- Double-Check Connections: Ensure all wires are connected to the correct terminals.
- Check for Loose Wires: Make sure all wire nuts are secure and no wires are loose.
- Use a Voltage Tester: Confirm that the power is flowing correctly through the switches and to the light fixture.
Conclusion 🎉
A 2 way switch wiring can seem daunting at first, but with the right tools, materials, and a bit of patience, it’s a manageable DIY project. By following this guide, you can control your lighting from two different locations, adding convenience and functionality to your home. Remember to always prioritize safety and consult a professional electrician if you’re unsure about any part of the process. Happy wiring!
Feel free to ask any questions or share your own 2 way switch wiring tips in the comments below!


